What is Wookie Wizard? The Wookie Wizard is one among the best and amazing Kodi add-on with numerous useful supporting add-ons or builds. This build has a home page includes fifteen customized web pages that contains a wide range of video contents. It has a user-friendly and simple interface to use. You can also customize its interface and as well as skins to create a different appearance.
It has a various list of supporting add-ons which assist the users to stream the online movies and as well as other special add-ons to view the Live Sports Channel, Music Channel, and many more. Now, we can discuss the different available web pages within the Wookie Wizard Kodi add-on.

Home Page
The Homepage of the Wookie Wizard includes an amazing menu and easy navigation to different categories. You can find Kodi HD (High Definition) movies, Kids section, Sports Zone, and many more. The user can easily access the categories by scrolling the cursor right or left direction. Within the main menu, you can locate the specific content’s shortcut to use during the add-on access.
Live TV
This is one among the most popular and useful categories that are available within the Kodi build and used to stream the online live contents such as Sports, TV Shows, Movies, and much more. It also includes numerous Live TV channels for online streaming.
Covenant
Covenant is another most popular and useful add-on that is available within the Wizard builds. It contains various different content categories and also has a user-friendly interface. Within the main menu, you can locate the shortcut options for TV shows and the latest movies.
Sports Zone
This is the best and interesting category that is available within the Kodi add-on to enjoy the sports world. Besides, it also contains numerous sports add-ons such as Halow Live, Sports World, Deliverance, and many more.
TV Shows
This category includes a wide range of collections of favorite TV shows. It includes various add-ons within this category such as Elysium TV, Poseidon TV, Falcon TV, and many more.
Now, let us proceed to the installation process on how to download and install the Wookie Wizard Kodi add-on.
Wookie Wizard Installation Process
We are going to follow two different installation processes to install the Wookie Wizard on Kodi application.
Wookie Wizard Kodi Add-on – Installation with the help of Zip file
Initially, you can make use of the zip file which you had downloaded earlier to install and follow the process to activate the Kodi add-on. Let us start the installation process:
Stage 1
- First, you have to download the appropriate Zip file (which contains the required files for installation) from any one of the trustworthy websites and store the file to your computer‘s local hard drive space.
- Access the Kodi application and select the Add-ons sub-menu. It should be available within the Kodi application’s main menu.
- Press the Open Package option under the Add-ons sub-menu. It will be available under the Kodi application’s logo or top right-hand side screen corner.
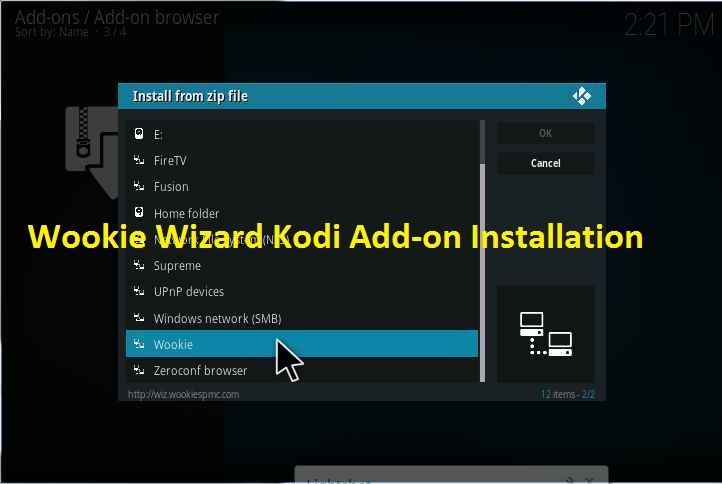
- Within the available options, choose the option to install the Kodi add-on by utilizing the Zip file.
- Browse and locate the appropriate folder location to view the downloaded file.
Windows Users – It is much easier to find the installation Zip files (that is Wookie Wizard Download files) on your desktop folder. You can navigate to the following folder location C:\Users\Your appropriate username\Desktop\Wookie.zip files. In case if you are not able to locate the Zip file then you can browse and identify the same under your Downloads folder. So, navigate to C:\Users\Your appropriate username\Downloads\Wookie.zip files to download the same.
Mac OS Users – Most common, the Mac Operating system will automatically store the downloaded Zip files within the Downloads folder, which can be accessed under the bottom-screen Dock. In this case, you can drag-and-drop the appropriate files from the Downloads folder to your desktop screen. So, you can easily access the Desktop/Wookie.zip file or also access safe Safari unzips once after downloading the files.
It is essential to use only the Zip file format to proceed. You can disable the automatic unzipping format within the Safari web browser by following the below steps:
- Access the Safari browser and navigate to the Preferences menu.
- Select the General Tab.
- Scroll down the page and disable the option named “Open up the stored safe files once downloaded”.
Stage 2
- After identifying the installation zip file within the Kodi application proceed with the installation process of the Wookie Kodi add-on.
- You will receive a pop-up message stating that the installation is completed.
- Navigate to the Add-ons section and press the Wookie Kodi add-on icon.
- You can find the following options during the installation process: Tools, Community Builds, Install Wookie, World Add-ons, and Close.
- Press the Install Wookie option and you will be provided a list of available Kodi add-ons. Choose the latest Kodi version (which is named as Krypton V17.1) and press the Krypton – Wookie New Look.
- It is required to clean the cache memory of your Kodi application to overcome the wrong installation. Navigate to the Tools section and press the Clear Cache option to clear the cache memory. Now, the installation process will go smooth without any issues.
- Ensure that you have at least 300 MB free space to download the essential files to execute the program. If so, then you can go with the installation process.
- After the installation is successful, you can close and restart the Kodi application to run the Wookie Kodi add-on to enjoy watching the latest movies.
Wookie Wizard Kodi Add-on – Installation with the help of Repo (Repository)
In case, if Wookie wont install on your Kodi application then you can go with another method. Instead of utilizing the Zip file installation, you can download the Kodi add-on from any one of the trustworthy websites and install the same on your Kodi application. You can follow the below-provided instructions to perform:
Stage 1
- Access the Kodi application and navigate to the System menu (a gear-shaped icon located near the top left-hand side screen corner).
- Launch the File Manager and tap the option named Add Source.
- Now, you will receive a pop-up notification and choose the None option.
- You have to more cautious while entering the Repo (Repository) web URL (com or wiz.wookiespmc or wookiespmc com, you can use any one of these trustworthy websites).
- Enter the media source name as Wookie and press the Ok button.
- Again access the Add-ons sub-menu on your Kodi application.
- Access the Open Package sub-category and press the Installation process with the help of Zip file.
- Navigate to the Wookie Kodi add-on and choose the wookiespmc file named (wookie.zip).
- You can use the link named Wookie APK Download to save the installation zip file (wookie.zip).
- The installation file will automatically download and process the installation on your Kodi application. Now, you will receive a pop-up message stating that the Kodi add-on is ready to use.
Stage 2
- Navigate to Add-on section and launch the Wookie add-on. You will receive a greeting message to install the Wookie Wizard. Select the Wookie New Look and press the Install icon to proceed with the installation process.
- You will also list other options like Retro Wookie, Lite Wookie, etc. Most of the add-ons provide the best platform to watch live TV channels and movies.
- You need to select the appropriate version to continue with the installation. Under Tools, you can choose the Wookie Wizard Installer to proceed. Before installation, it is required to clear the cache files and as well as delete the old packages.
- Now, the Wookie add-on will download the essential files to process the installation.
- After the installation is successful, you can close and restart the Kodi application to run the Wookie Kodi add-on to enjoy watching the latest movies.
How to install the Wookie Kodi add-on on your computer
This is one among the famous and most popular video Kodi add-on to watch or stream the recent TV episodes, shows, and movies. Within the home screen, you can view top-rated videos and HD (High Definition) videos as well. Under Special categories, the viewers are allowed to watch their favorite movies and TV shows. Even, multiple languages support is available to watch their preferred video contents on their own languages.
Initially, it is required to install the Kodi older version from the Kodi official website and then proceed with the installation of new Kodi version Krypton V17.6 (Sometime, Wookie will not install if you have not upgraded from the earlier versions):
Stage 1
- Access the Kodi Krypton version v17.6 on your computer (Windows variant).
- Navigate to the Settings icon that is located on the Kodi application’s home screen.
- Within the Settings option, navigate to the File Manager section from the available list.
- From the File Manager section, choose the Add Source sub-category.
- You will receive a pop-up window and choose the option named None.
- You have to more cautious while entering the Repo (Repository) web URL (com or wiz.wookiespmc or wookiespmc com, you can use any one of these trustworthy websites).
- Enter the appropriate media source name (for example as Wookie Add-on) and press the Ok icon.
Stage 2
- Return to the Kodi application’s home screen by pressing the Esc (Escape) key on your keyboard.
- Choose the Package Installer option under the Add-ons section.
- On your new Windows, you need to select the installation to process with the help of the Zip file.
- Now, select the media source file named Wookie Add-on and choose the appropriate zip file (wookie.zip file).
- Wait for a few minutes to get the install message. You will receive a pop-up notification stating to continue with the process.
- Press the Continue button to proceed with the installation process.
- After some time you will receive a notification stating that the installation is successful.
Now, you can utilize the Wookie Kodi add-on on your Windows computer successfully without any issues. The viewers are allowed to watch or stream any HD (High Definition) video contents like TV episodes, TV shows, and movies to have fun and enjoy.
You may also like: How to install TV Tuga Kodi Add-on in simple steps 2019


